
ReactJS Seed Application: Why Not Start with the Real Deal?
Making the decision to go with ReactJS as the framework for our new UI was just the first of of many steps in our implementation. Step two was deciding how to tackle the project. Since React was new to us, we decided to build a seed application first.
We did this for a few reasons. For one, a seed application allowed us to try out different libraries and project structures without the restriction of a particular use case. As we all know, when you develop something for a specific task (e.g. a dashboard application), you tend to build everything tied to this one use case. Which is all well and good, but as soon as you try to reuse some of the code or extend the application to a different use case, you can run into big problems.
You might be wondering, “why didn’t you just use an existing seed application?” Everyone knows if you google for “React seed application” or “React boilerplate” you will find tons of prebuilt seed applications out there, some of which are being used by thousands of people. After looking at these, we found that though a lot of them offered unique and interesting concepts, none of them seemed very scalable to us for use in large web applications. So we got creative. If you take a close look at our concepts, you’ll see that many are a mix of existing seed applications and our own engineering.
Getting Started: Finding a Module Builder
Browserify was the first technology stack our team worked with at Hyperwallet. We looked at this tool to build the final browser version; we were also looking for tools to replace JSHint and JSCS for code quality. We settled on Gulp as our main build tool, but we’ll get to that later.
Selecting Browserify as our initial stack is a very good example of why a seed application can be useful. At the beginning, it appeared as though this module builder would work perfectly for the project we had planned; however, after doing some more research and playing around with it we found Browserify had one major issue: the application size would be too big for a major project. No one wants their users to have to download 10MB of JavaScript in order to use an application. Yes, we could have gone with a multiple entry files build by Browserify and then manually loaded the different files. But that would have added a lot of complexity to the project. So we kept looking and ended up finding webpack. If you haven’t checked it out yet, I definitely recommend that you do. It’s code splitting feature is amazing.
The next thing we focused on replacing was JSHint and JSCS. Our tool of choice? The far more modular ESLint. In addition to the modularity, it also supports React and JSX validation, which is a big plus for developing React applications. We were also big fans of the external configurations features, as it enabled us to share our ESLint setup across our JavaScript projects.
In terms of supporting libraries, we decided to use Redux for our data flow. This enabled us to do make some major changes during the seed application development. Our first attempt was splitting off reducers and actions… however, we quickly figured out that it was a lot easier to keep these in one file since one can’t work without the other, after all. This improved the readability of our reducers and actions quite a bit.
A Note on Folder Structure
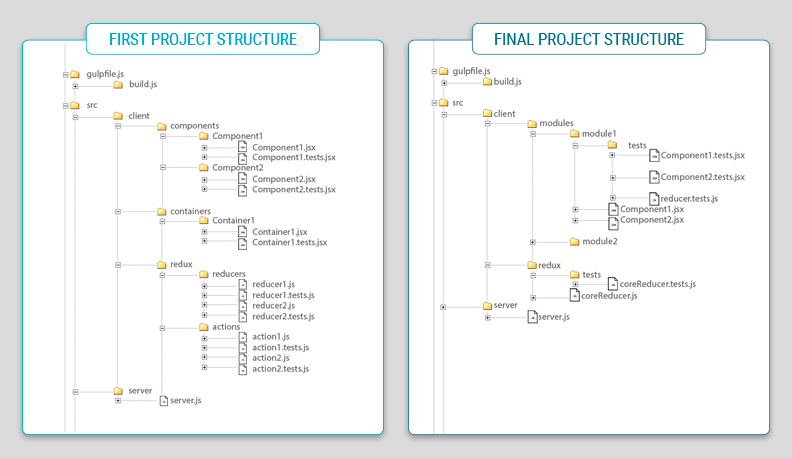
Last but not least, we changed the directory structure. Looking at the most common React seed applications you will see that they have, for each component, a custom folder and they group them all as components. Again, this works very well for small applications and test projects. But imagine having a full blown web application with signup, login, dashboard, profile, … you get the picture. You’re going to end up with thousands of smaller and bigger components each in their own folder. Keeping track of all the files is going to be very difficult. So we decided to go with a different approach and created modules. Each module can contain multiple React components, one reducer (optional) and multiple services/utils. This makes it easy to identify components that belong together while still allowing cross-component usage. For example, if you have a UserTable component you also will have a UserTableColumn Component. Within the structure we used they belong to the same module and the same user-list module.
Working on a seed application can help you steer the foundation of your project to a goal that works not just for the one use case you have in mind at that moment, but actually provides a foundation that can both scale and extend, as well as be reused for new projects.
But enough with the theory. Next time we’re going to explain our build system (Gulp), why we went with it, and what usual tasks we have.