
Paying Your First User: A Hyperwallet REST API Tutorial
So you’ve just created the world’s next best marketplace and your user base is growing fast. From Australia to Zambia, your users are everywhere… and they all need to get paid. Thankfully, Hyperwallet’s APIs take the hassle out of paying these folks, whether they’re here, there, or well, just about anywhere!
This tutorial will walk you through the process of paying your users using Hyperwallet’s REST APIs. We’ll be using our JavaScript Widget to interact with the APIs, but don’t forget to check out GitHub for our SDKs if you’d like to work with our APIs through your backend application.
Getting Started
To get started with Hyperwallet’s payout platform, you’ll first need to sign up for a developer account through our Developer Portal. Once you’ve registered your details, you’ll receive an activation email at the address you provided.
Make sure you write down your new account ID that we sent in the email as you’ll need it to login. You can think of this account ID as the identifier for your own personal sandbox. To login to your new sandbox, simply click through the Get Started link in the email or head over to the portal’s Login page.
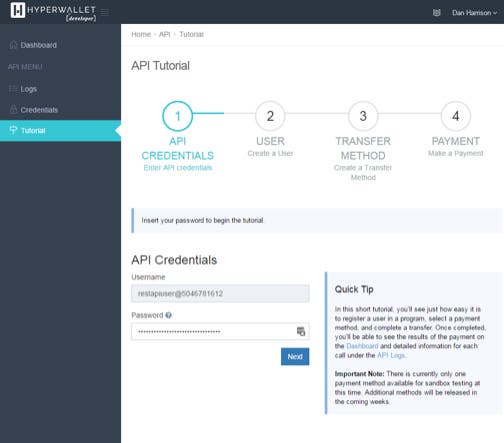
Setting Your API Credentials
After you’ve logged in, click through to the first page of the tutorial as seen below. You’ll notice that the Username field is greyed out, and there’s a strange username in there! Don’t worry, we’ve simply created a new user within your sandbox that is meant to be used only for making API calls — your new ‘restapiuser.’ When making API calls, combine this ‘restapiuser’ with your account ID, written restapiuser@<accountid>, and use that as your username. The provided account ID allows our platform to identify which sandbox your ‘restapiuser’ belongs to. The password is the same as the password you set when signing up.
Creating a User
Once you’ve saved your credentials, you’ll be able to start building your first API call.
If you’re in a rush, the Auto Populate button will fill out the form fields with some randomized information for you. As you fill out the form fields, take a look at how the Request panel changes on the right. A description of all the form fields can be found in our API documentation.
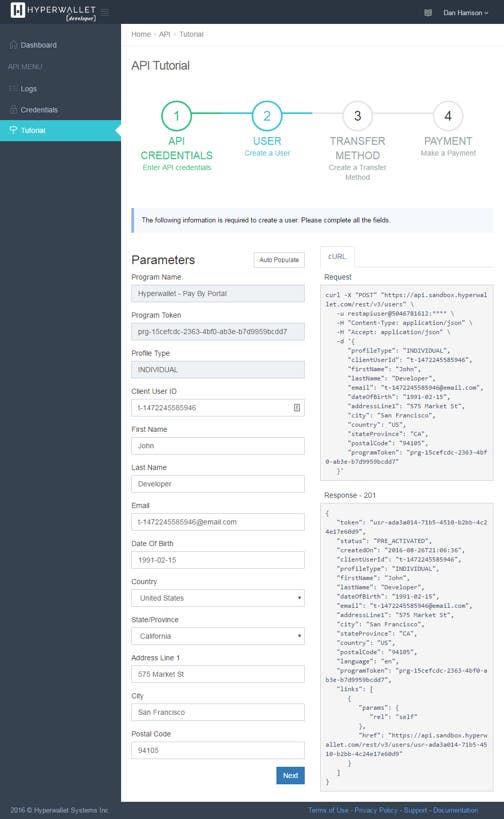
After you’ve finished filling out the form fields, submit the form and you will see the Response panel appear in the bottom right of the page. In this case, we received a 201 status code from our API along with the response information, which means that the request was successful and the user was created. For a description of the other available status codes, please see our documentation. Now that the user is in our system, it’s time to add a transfer method so the user can receive some money. Click Next to move on to adding a transfer method.
Adding a Transfer Method
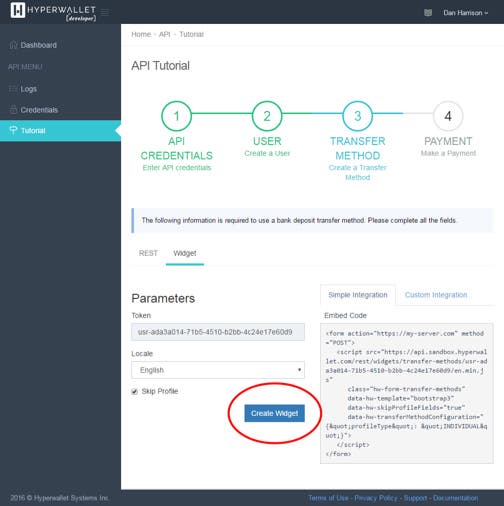
Hyperwallet offers a variety of payout options, or what we call transfer methods. These include local bank transfers, wire transfers, prepaid cards, MoneyGram, paper checks, and more. Due to the complex nature of the global banking networks, each of these transfer methods has different requirements, and even the same transfer method type may have different requirements depending on the user’s country. To simplify the information gathering process, our JavaScript Widget includes logic that presents only our most common options depending on the location of the user: local bank transfer, wire, and checks. Without the Widget, your team would need to know the requirements and naming scheme of each payout option for each country within which your users reside. To get started with the Widget, hop over to the Widget tab and click Create Widget.
Take a look at how the available account types change depending on which country you select. For an example, payees in Brazil can use a bank account as a payment method, but not MoneyGram or Paper Checks.

The United States, in comparison, has multiple options.
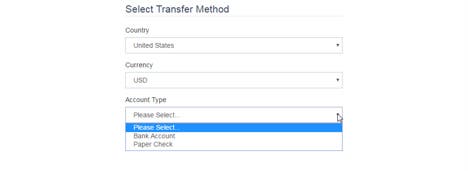
Go ahead and select a country and transfer method of your choosing. I selected a US bank account and will add some invalid information to highlight a very important feature of the Widget.
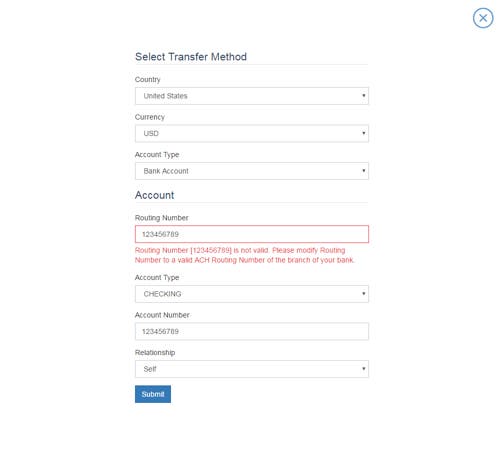
More than just a drop-in solution for capturing and submitting account details within your web application, the Widget also verifies the accuracy of the information. This validation ensures that any account information that is provided references a valid financial institution, resulting in an over 99.5% transaction success rate through our platform. The description for each of the fields used when adding a bank account can be found in our documentation.
Ensure that you have entered valid account information (the account number does not have to be real), and submit the form to add the transfer method to the user’s profile. Upon submission, the Widget will disappear — click the Next button to move on to creating a payment.
Making a Payment
At last, let’s send some money (well, this is a sandbox, so it’s not real money). You can either fill out the form fields or use the Auto Populate feature to complete the form. The description for each of the other fields can be found in our documentation. Click Submit and you’re all done!
With just three API calls, we’ve registered a user, added a bank account, and submitted a payment to that user. Not bad for a few minutes work!
Next Steps
So you’ve ‘paid’ your first user – now what? This tutorial just scratches the surface of what’s possible with Hyperwallet’s platform. To see how you can create prepaid cards, see account balances, transaction history, and more, check out our API documentation.